It seems that lately every time a new recipe pops up it is some new take on the classic s'more. The crazy part is that each and every variation looks so freaking delicious! And I don't think I'll be getting over this 'craze' anytime soon. Despite the cooler temperatures I think my next s'more adventure will be some version of s'more ice cream...hmm. Ohhh, or maybe s'more brownies!
This particular dessert came about because a couple weeks ago I found myself with 4 bags of mini marshmallows, and nowhere to store them. 4 bags! Ridiculous right?
As I was whipping up the sweet sauce on Wednesday for a batch of home-made Donairs (which were followed by Donair pizzas the next night, yum!), I accidentally opened a can of 'sweetened condensed milk' instead of 'evaporated milk'. Oops. Luckily, I noticed before I had added the garlic powder!
Ew, garlic powder and sweetened condensed milk? I just grossed myself out.
So I set aside the sweetened condensed milk, determined to find a use for it so that it didn't go to waste. After dinner was done I searched around online and saw that there were a ton of super simple bar recipes that involved it.
I realized that many of the recipes involved simply pouring the sweetened condensed milk over a base or crust and then baking it all together. I took a quick inventory of my pantry, and these were born! I am sure that there are very similar recipes out there, but I managed to create this as I went so I'm pretty proud of them. I decided to dye the condensed milk with some orange gel food colouring for Halloween, and the colour came out great!
This makes enough to fill a 9 x 13" pan. These are quite sweet, so you can get a lot of tasty little squares out of this recipe!
Coconut Chocolate Halloween Squares
- 1 1/2 cups oreo crumbs
- 1/2 cup melted margarine
- 2 1/2 cups shredded coconut
- 1 can (14 oz) sweetened condensed milk
- orange gel food colouring (optional)
- 1 1/2 cups semi-sweet chocolate chips
- 1/3 cup white chocolate chips
- sprinkles
- Spray a 9 x 13" pan with cooking spray and pre-heat the oven to 350 F
- Mix together the oreo crumbs and the melted butter. Press the oreo crumb base firmly into the prepared pan
- Sprinkle the coconut evenly over the oreo layer
- Add some orange food colouring to the condensed milk and mix well
- Pour the sweetened condensed milk over the coconut, and carefully spread it out evenly
- Place the pan in the oven and bake for about 25 minutes, or until the edges are browned
- Remove from oven and place on a wire rack
- Once the pan has been removed from the oven, melt the chocolate chips by microwaving at 30 second intervals, stirring between each, until smooth
- Pour the melted semi-sweet chocolate over the still-warm coconut layer, and spread evenly
- Place the white chocolate chips in a sandwich bag, and microwave at 30 second intervals, mixing the chocolate together in the bag between each interval
- When the white chocolate is melted, snip off a corner of the bag and drizzle it randomly all over the chocolate
- If you wish, you can drag a toothpick through the chocolate to give it more of a 'swirly' effect. (yes, that's a technical term. swirly)
- Sprinkle on your favourite Halloween sprinkles
- Let sit for 20 minutes, and then place in the refrigerator until chocolate has hardened
- Cut into squares, and Enjoy!

I'm beginning to realize that the insane chocolate cravings hit at least once a week. At least they provide me with an excuse to seek out new chocolate recipes, right?
I spotted these brownies (Dark Chocolate Brownies with Toasted Walnuts and Salted Caramel Glaze) over on Creative Culinary and figured it was time to give this salted caramel thing a try. I believe Barbara originally found this recipe in a Food and Wine magazine, but then amped it up with the addition of Kahlua and salted caramel, and man am I glad she did!
I halved this recipe because I was afraid of having an entire pan of this in my house! It was definitely a good decision as I couldn't stop eating them.
Dark Chocolate Walnut Brownies with Salted Caramel
- 1/2 lb butter (unsalted)
- 3/4 pounds bittersweet chocolate, chopped
- 1/2 cup flour
- 1/2 tbsp baking powder
- 1/2 tsp salt
- 3 eggs
- 1 1/4 cups sugar
- 1 tbsp vanilla
- 50 mL Kahlua (I used one of those mini bottles)
- 1 tbsp strong coffee
- 1/2 cup semi-sweet chocolate chips
- 1 cup walnuts, roughly chopped and toasted
- Caramel Topping
- 1/4 cu p whipping cream
- 1 cup sugar
- 1/4 cup water
- 2 tbsp butter, cubed
- 1/4 tsp salt
- sea salt for sprinkling
- Preheat your oven to 350 F and spray a 9" x 9" pan with baking spray
- In a small saucepan melt the butter and chocolate together over low heat, set aside
- In a bowl whisk the eggs and sugar together until very pale and thick
- In a second small bowl, whisk together the flour, baking powder, and salt
- Add the Kahlua, vanilla, and expresso to the sugar mixture and mix well
- Add the flour mixture to the wet ingredients and again mix well
- Pour the chocolate into the rest of the ingredients and mix until well incorporated
- Fold in the chocolate chips and toasted walnuts
- Pour into the dish, and bake for 45 min to 1 hour (until the edges are set)
- While the brownies are cooling, prepare the caramel
- In a small microwave-safe dish heat the cream until warm (do not boil)
- In a small saucepan add the sugar and water and allow it to come to a boil (without stirring)
- Let the water and sugar boil until it turns a beautiful amber
- When the sugar has reached the desired colour, remove the saucepan from the burner and pour in the cream and salt
- Whisk until smooth and then pour over the cooled brownies
- Sprinkle with sea salt
- Enjoy!

Once again a massive chocolate craving struck, and I had to make do with what I had in my cupboard. I was so excited when I realized I had everything I needed to make some brownies!
RIght before mixing in regular chocolate chips, I decided to make some mint brownies and threw in some mint extract and mint chocolate chips instead. Oh how I loved this impulse decision!
I used my Walnut Brownie recipe as a guide, and baked it in a 9" x 9" pan to make them nice and thick :)
These definitely did the trick, at the first bite I was in heaven! They also made a wonderful addition to my breakfast all week :)
Mint Brownies
- 1 cup butter or margarine, melted
- 2 cups sugar
- 4 eggs
- 1 tsp vanilla
- 1 tsp mint extract
- 2/3 cup cocoa
- 1 cup flour
- 1/2 tsp salt
- 1/2 tsp baking powder
- 1/2 cup mint chocolate chips
- Preheat oven to 350 F and grease a 9" x 9" pan (or spray with baking spray)
- Mix the melted butter and sugar together in a large bowl
- Add the eggs one a time, and then the extracts
- Add the cocoa and mix well
- Add the flour, salt, and baking powder and mix until the batter just starts to come together
- Fold in the mint chocolate chips and then pour into the prepared pan
- Spread with a spatula, and then bake for 35 - 40 minutes (or until a toothpick comes out with some crumbs when inserted)
- Enjoy!
If there is one dessert that my mom makes that I absolutely salivate over, it is her Nanaimo Bars! I believe that this is a predominately Canadian dessert, and it is ridiculously good.
For me, these goes hand-in-hand with a Christmas celebration at my parent's house. These bars consist of 3 layers, and each layer goes so well with the other two. I will admit that I didn't make these, I took pictures this past weekend at our family Christmas brunch :)
If you need to bring a dessert to a party, these are amazing! They are also much much better than the store-bought kind.
Nanaimo Bars
- For the bottom layer
- 1/2 cup butter or margarine
- 1/4 cup sugar
- 5 tbsp cocoa
- 1 egg, beaten
- 1 3/4 cups graham wafer crumbs
- 1 cup fine coconut
- 1/2 cup finely chopped walnuts (optional)
- For the middle layer
- 1/2 cup butter or margarine
- 3 tbsp milk
- 2 tbsp vanilla custard powder
- 2 cups icing sugar
- For the top layer
- 2/3 cup semisweet chocolate chips or 4 squares of semisweet chocolate
- 2 tbsp butter or margarine
- For the bottom layer
- Grease a 9" x 9" pan
- Melt the butter/margarine, sugar and cocoa together in a heavy saucepan
- Add the egg and stir to cook & thicken
- Remove from heat, and stir in the graham crumbs, coconut, and nuts
- Press firmly into the prepared pan
- For the middle layer
- Cream together the butter/margarine, milk, custard powder, and icing sugar
- Beat until light and fluffy
- Spread over the bottom layer
- For the top layer
- Melt the chocolate and butter together over low heat, stirring until smooth
- Remove from heat, and let it cool until it is comfortable to the touch but still spreadable
- Spread over the middle layer
- Place the Nanaimo bars in the refrigerator to chill
- After the bars have chilled (for a couple hours or overnight), cut into 36 squares with a sharp knife
- Enjoy!
I got a really neat cookie cookbook (The Book of Cookies ) for Christmas the other day (yes...I may have opened it already) and this recipe looked both pretty and tasty, so I decided to make it right away.
There are a few steps due to the three different layers, but it is worth the work!
This was also my first ever attempt at making caramel, and I am so glad to say that it was successful! Tasty too.
If you need a delicious dessert that isn't heavy on the sweetness, then this is definitely a good option. This recipe makes a full 13" x 9" pan
Marbled Shortbread Bars
- For the shortbread layer:
- 2 cups flour
- 1/4 cup sugar
- 3/4 cup butter or margarine, room temperature
- pinch of salt
- For the caramel:
- 1/2 cup butter or margarine
- 1 can condensed milk (about 14 oz)
- 2 teaspoons instant coffee mix (the powder/granules)
- 1/4 cup sugar
- 2 tbsp light corn syrup
- Chocolate topping:
- 6 oz semisweet chocolate
- 1 oz white chocolate
- To make the shortbread layer
- Preheat oven to 350 F
- Whisk together the flour, sugar, and salt
- Mix in the butter until a soft dough forms
- Press into the bottom of a 13" x 9" pan
- Prick well all over with a fork
- Bake for about 25 minutes, or until the edges are golden brown
- Let cool before adding the caramel layer
- To make the caramel layer
- While the shortbread is cooling, place all of the caramel ingredients in a saucepan
- Stir over medium heat until the butter melts and it begins to boil gently
- Boil until the caramel is thick enough to hold it's shape for a few seconds (use a spoon to drizzle a ribbon of caramel back in the pot and it stays for a few seconds). Note: the recipe said this would take 6 - 8 minutes, but my caramel took about 15 minutes
- When caramel is ready, pour it over the shortbread and smooth it out with a spatula
- To finish off the squares:
- Place the semisweet chocolate (either squares or chocolate chips) in a microwave-safe bowl
- Microwave at 30 second intervals, stirring between each interval
- When the chocolate is melted, pour it over the caramel, and smooth with a spatula
- Place the white chocolate in a plastic sandwich or ziploc bag
- Microwave at 30 second intervals, massaging the bag between each interval, until the white chocolate is melted
- When the white chocolate is smooth, cut a small hole in one corner of the bag and draw lines across the semisweet chocolate, about 2 centimetres apart
- Using a toothpick, swirl the white and semisweet chocolate together
- Let the chocolate set, cut into squares, and Enjoy!

This fudge is absolutely amazing! I have been sneaking pieces of this every time I pass my fridge since I made it a couple of days ago.
This recipe is really easy to make, and doesn't involve any complicated candy making (which is always a bonus!). The recipe originally said to strain the mixture to remove the remaining candy bits, but I loved the small pieces of crunch that the little candy bits produced in the fudge when I didn't strain mine.
This recipe is from marthastewart.com, and I strongly recommend that you make this for your next Christmas party. I absolutely love this stuff!
Peppermint Fudge
- 2 1/4 cups semi-sweet chocolate chips
- 10 candy canes, unwrapped
- 3/4 cup heavy/whipping cream
- 3 1/4 cups mini marshmallows
- 5 tbsp butter or margarine
- 1 1/4 cups sugar
- 1 tsp salt
- Spray a 9" square baking pan with baking spray, then line the pan with parchment and spray the parchment paper as well
- In a food processor, pulse the candy canes until they are very finely chopped
- Place the chocolate chips in a large bowl
- In a medium saucepan add the pulverized candy canes, cream, mini marshmallows, butter, sugar, and salt
- Stir over medium heat until well melted, and whisk until smooth
- Pour the peppermint mixture over the chocolate chips, and let stand for a minute
- Stir the mixture until nice and smooth
- Pour the fudge mixture into the prepared square pan, and smooth the top with a spatula
- Lick spatula, and enjoy the pure bliss
- Place the pan in the refrigerator to set for about 3 hours
- Cut the fudge into 1 1/2" squares to serve
- To store, place in airtight container in the fridge
- Enjoy!
I have been having a hardcore chocolate craving all week. And when I say hardcore, I mean 'grab a handful of chocolate chips every time I pass the pantry' kind of craving!
I searched through a ton of recipes, and finally picked this one from tastykitchen.com. It looked easy, delicious, and was incredibly versatile. 'lydiajo' (the recipe author) also had a great tip for cutting the brownies: use a plastic knife! I definitely recommend this as well, the brownies cut beautifully.
I decided to throw in semi-sweet chocolate chips to up the ante, and then topped the whole pan with chopped walnuts. You can make them without either, or add whatever else you like!
These were perfect, they solved my need for chocolate (for the moment), and had the perfect brownie texture too!
Walnut Brownies
- 1 cup butter or margarine
- 2 cups sugar
- 4 eggs
- 2 tsp vanilla
- 2/3 cup cocoa
- 1 cup flour
- 1/2 tsp salt
- 1/2 tsp baking powder
- 1/2 cup semi-sweet chocolate chips (optional)
- 1/2 cup chopped walnuts (optional)
- Preheat oven to 350 F, and grease a 9" x 13" pan
- Place the butter in a large microwave-safe bowl and microwave until melted
- Mix in the sugar, followed by the eggs (one at a time) and the vanilla
- Add the cocoa and mix well
- Dump in the flour, salt and baking powder
- When just mixed, throw in the chocolate chips (or any other additions! skor bits, mini m&m's, anything!)
- Fold in the chocolate chips, and then pour the mixture into the prepared pan
- Spread with a spatula, and then top with walnuts (if using)
- Bake for 25 - 30 minutes (or until a toothpick comes out with some crumbs on it when inserted)
- Let cool before cutting, and Enjoy!
Let me be straight with you, I have little to no experience making squares of any kind. I am not really sure why I have never had the urge to try them before, but I am currently very inexperienced in the dessert square department.
A couple months ago I tried a fantastic sounding recipe for fudge-y squares, and disaster! They tasted nasty!
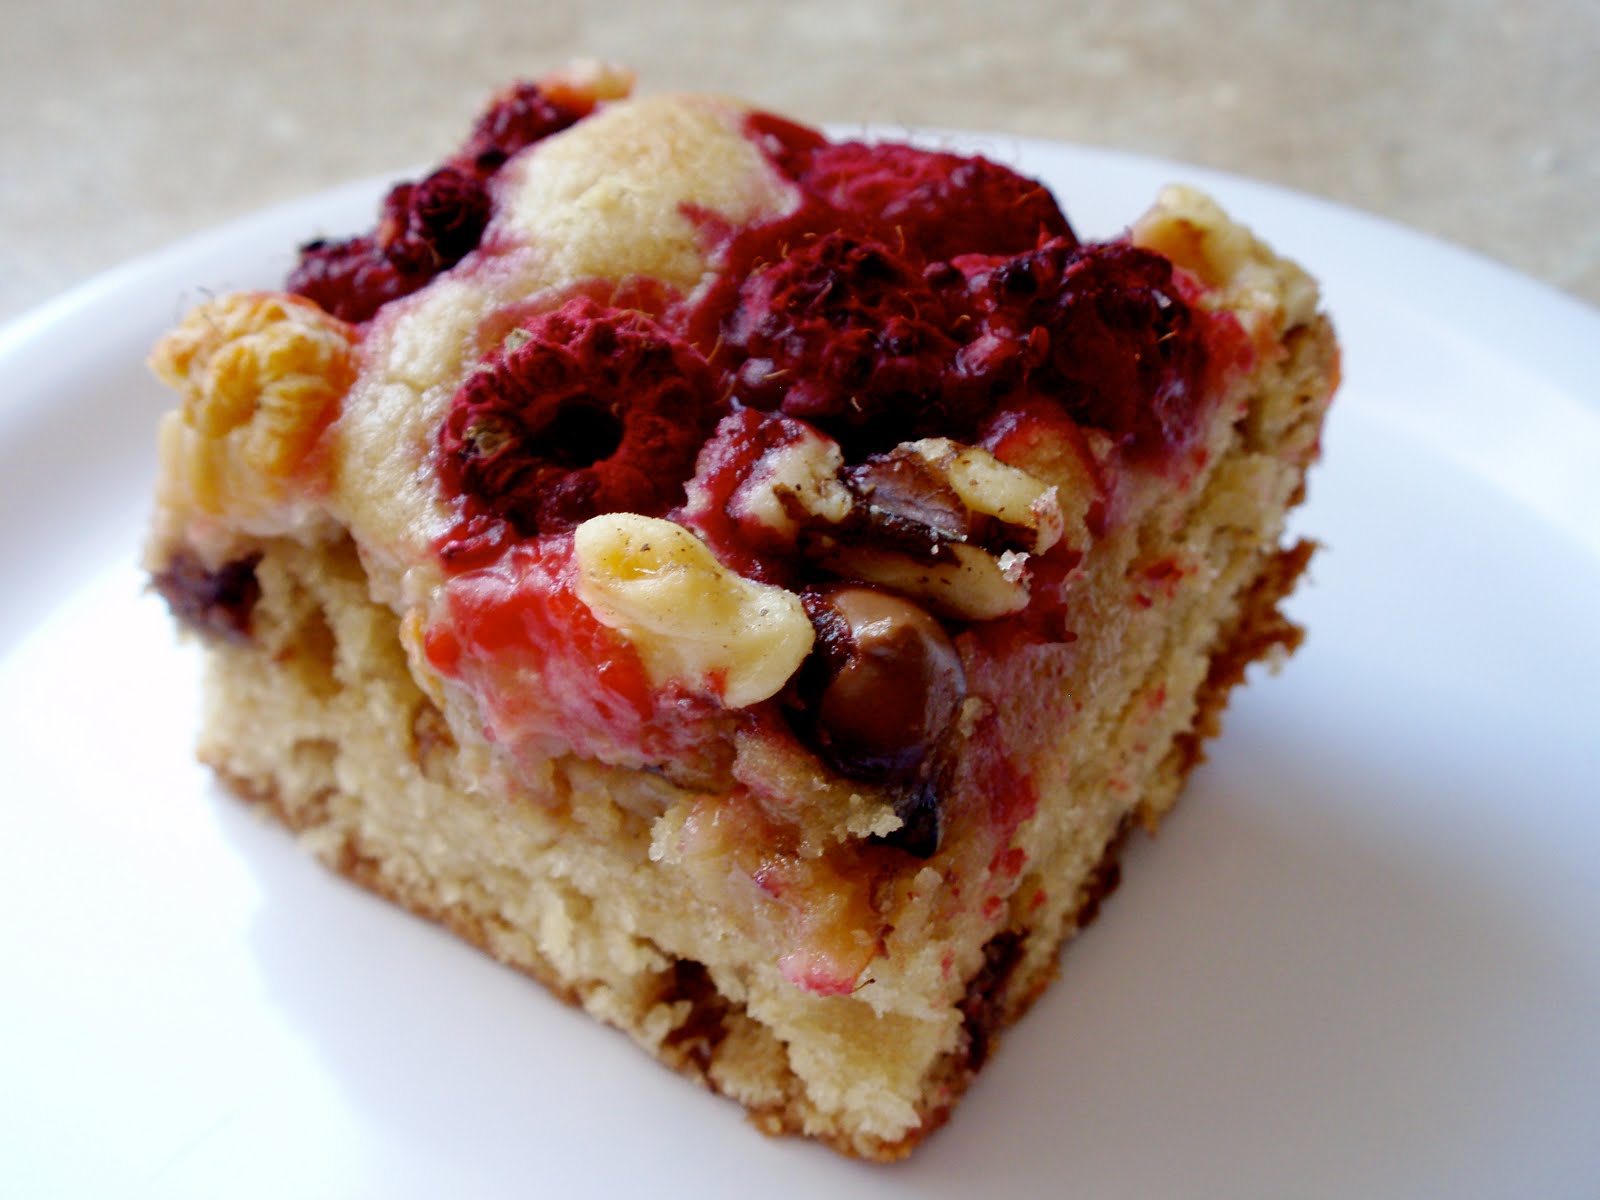
Then I saw this recipe on marthastewart.com, and I figured, "these looked way too delicious to go as badly as my first attempt!". So I gave squares a second chance. And you know what? I am glad I did! These were so delicious, and the recipe is really versatile. I used what I had left in my pantry instead of buying the almonds the recipe called for, and the blondies were fantastic!
I topped mine with red and yellow raspberries, walnuts, and chocolate chips. The raspberries tasted amazing in this recipe. The original recipe can be found here.
Raspberry, Walnut, and Chocolate Blondies
- 1/2 stick plus 1 tbsp butter
- 1 2/3 cups flour
- 1 tsp baking powder
- 3/4 tsp salt
- 1 cup brown sugar, packed
- 2 eggs
- 1 tsp vanilla
- 1/2 cup walnuts
- 1/2 cup chocolate chips
- 1 cup (generous) raspberries
- Line a square baking pan (8") with parchment paper and butter the lining
- Preheat your oven to 325 F
- Mix together the flour, baking powder, and the salt in a bowl
- Beat together the sugar and the butter until it is well mixed and fluffy in a second bowl
- Add the 2 eggs and the vanilla to the sugar mixture, mix well
- Add the dry ingredients to the wet, and mix thoroughly
- Add 1/4 cup of walnuts and 1/4 cup of chocolate chips to the batter and mix until evenly distributed
- Pour the batter into the square pan and spread it around with a spatula to level it
- Cover the batter with the raspberries, remaining walnuts, and remaining chocolate chips
- Place in oven and bake for about 50 minutes to 1 hour, or until a toothpick inserted comes out clean
- Cut into squares, and enjoy!